本地镜像
实验拓扑
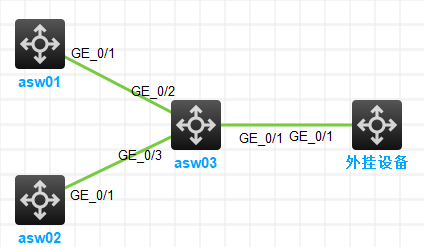
实验目的
- 可以让外挂设备监听到asw01、asw02设备发出的信息
实验做法
步骤 1:asw03设备配置本地镜像解析
[asw03]mirroring-group 1 local   #创建一个本地镜像组
[asw03]mirroring-group 1 mirroring-port GigabitEthernet  1/0/1 to GigabitEthernet 1/0/2 both/inbound/outbound           #配置源端口这里可以选择入、出、both所有
[asw03]mirroring-group 1 monitor-port GigabitEthernet  1/0/3  #配置目的端口
远程镜像
实验拓扑
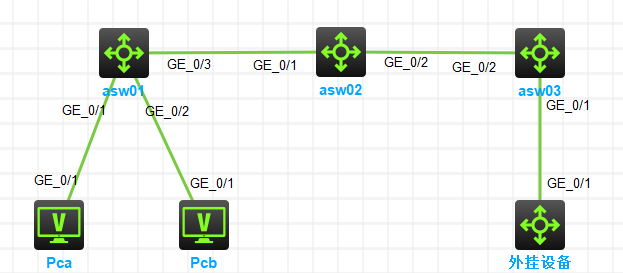
实验目的
- 可以让外挂设备跨设备远程监听到Pca、Pcb设备发出的信息
实验做法
步骤 1:asw01源设备配置镜像解析
[asw01]mirroring-group 1 remote-source  #创建远程镜像组
[asw01]vlan 10  #创建个vlan传输镜像内容
[asw01]mirroring-group 1 remote-probe vlan 10   #配置远程镜像vlan
[asw01]mirroring-group 1 mirroring-port GigabitEthernet  1/0/1 to GigabitEthernet  1/0/2 inbound   #配置镜像端口
[asw01]mirroring-group 1 monitor-egress GigabitEthernet  1/0/3   #配置出接口
[asw01]interface  GigabitEthernet  1/0/3   #进入1/0/3接口
[asw01-GigabitEthernet1/0/3]port link-type trunk   #配置为trunk模式
[asw01-GigabitEthernet1/0/3]port trunk permit  vlan  10  #允许带vlan10标签传输
步骤 2:asw02中间设备配置解析
[asw02]vlan 10  #创建vlan
[asw02-vlan10]no mac-address mac-learning  enable   #禁止MAC地址学习功能
[asw02]interface  range GigabitEthernet  1/0/1 GigabitEthernet  1/0/2   #进入1/0/1-1/0/2接口
[asw02-if-range]port link-type trunk   #配置为trunk模式
[asw02-if-range]port trunk  permit  vlan  10   #允许带vlan10标签传输
步骤 3:asw04镜像目的设备配置解析
[asw03]vlan 10   #创建vlan
[asw03]interface  GigabitEthernet  1/0/1    #进入1/0/1接口
[asw03-GigabitEthernet1/0/1]port access  vlan  10   #将接口键入到vlan10中
[asw03]interface GigabitEthernet  1/0/2   #进入1/0/2接口
[asw03-GigabitEthernet1/0/2]port link-type trunk  #配置为trunk模式
[asw03-GigabitEthernet1/0/2]port trunk  permit  vlan  10   #允许带vlan10标签传输
[asw03]mirroring-group 1 remote-destination    #创建远程目的镜像组
[asw03]mirroring-group 1 remote-probe vlan 10   #配置远程镜像vlan
[asw03]mirroring-group 1 monitor-port GigabitEthernet  1/0/1   #配置目的端口